Widespread Augmented Reality

Widespread Augmented Reality
Click on the image to get the Android Augmented Reality Heads up Display

Sunday, September 8, 2019

Python Machine Learning on Amazon stock prices

This Python code reads Amazon's historical stock prices from 2014 to 2019. I downloaded the CSV file from Yahoo Finance. The chart below shows how well this algorithm predicts stocks prices when compared to actual stock prices. The code was cobbled together from snippets at Analytics Vidhya and Medium.

# importing libraries
import pandas as pd
import numpy as np
from datetime import date, datetime
import calendar
#importing required libraries
from sklearn.preprocessing import MinMaxScaler
from keras.models import Sequential
from keras.layers import Dense, Dropout, LSTM
# reading the data df = pd.read_csv('amzn2.csv')
# looking at the first five rows of the data
print('\n Original data:')
print(df.head())
print('\n Shape of original data:')
print(df.shape)
# setting the index as date
df['Date'] = pd.to_datetime(df.Date,format='%Y-%m-%d')
df.index = df['Date']
#creating dataframe
data = df.sort_index(ascending=True, axis=0)
new_data = pd.DataFrame(index=range(0,len(df)),columns=['Date', 'Close'])
#populate new data frame
for i in range(0,len(data)):
new_data['Date'][i] = data['Date'][i]
new_data['Close'][i] = data['Close'][i]
#setting index
new_data.index = new_data.Date
new_data.drop('Date', axis=1, inplace=True)
#creating train and test sets
dataset = new_data.values
#the csv file has 1260 records
train = dataset[0:630,:]
valid = dataset[630:,:]
#converting dataset into x_train and y_train
scaler = MinMaxScaler(feature_range=(0, 1))
scaled_data = scaler.fit_transform(dataset)
x_train, y_train = [], []
for i in range(60,len(train)):
x_train.append(scaled_data[i-60:i,0])
y_train.append(scaled_data[i,0])
x_train, y_train = np.array(x_train), np.array(y_train)
x_train = np.reshape(x_train, (x_train.shape[0],x_train.shape[1],1))
# create and fit the LSTM network
model = Sequential()
model.add(LSTM(units=50, return_sequences=True, input_shape=(x_train.shape[1],1)))
model.add(LSTM(units=50))
model.add(Dense(1))
model.compile(loss='mean_squared_error', optimizer='adam')
model.fit(x_train, y_train, epochs=1, batch_size=1, verbose=2)
#predicting 246 values, using past 60 from the train data
inputs = new_data[len(new_data) - len(valid) - 60:].values
inputs = inputs.reshape(-1,1)
inputs = scaler.transform(inputs)
X_test = []
for i in range(60,inputs.shape[0]):
X_test.append(inputs[i-60:i,0])
X_test = np.array(X_test)
X_test = np.reshape(X_test, (X_test.shape[0],X_test.shape[1],1))
closing_price = model.predict(X_test)
closing_price = scaler.inverse_transform(closing_price)
rms=np.sqrt(np.mean(np.power((valid-closing_price),2)))
print('\n Root Mean Square Deviation:')
print(rms)
#for plotting
#plot
import matplotlib.pyplot as plt
train = new_data[:630]
valid = new_data[630:]
valid['Predictions'] = closing_price
plt.plot(train['Close'])
plt.plot(valid[['Close','Predictions']])
plt.show()

Wednesday, July 17, 2019

Victory Cross Country 2011 motorcycle stalling

Came to a stop okay, but then accelerated and the bike stalled like it was flooded but it's fuel injection. Rolled to a stop on a downwill slope and reastarted briefly. The engine light was on and it stalled again, never to restart. Battery working as evidenced by lights being on and pump priming. The culprit was a busted and dangling tip over sensor that cuts off the fuel supply when bike is on its side. Since the tip over sensor broke off and was dangling upside down, the bike was going no where fast. Must replace tip over sensor. Found one here.

Thursday, June 27, 2019

Python and MySQL on the Kindle Fire HD 6 inch

  • I got a QPython IDE from here: ww.appsapk.com/qpython-python-for-android
  • MySQL and PHPMyAdmin came from here: www.apkfiles.com/apk-541908/android-web-server-kickweb-server-5-0
  • From pip console in the QPython app, I ran "pip install mysql-connector --index-url https://qpypi3.qpython.org/simple/.
  • At the time that you read this, the links may have changed, but the approach will be the same. Find a QPython apk that you can download from outside of Google Play, see if you can use the PIP console to install AI libraries, adjust the QPypi url in the settings if needed, get a web server app with MySQL and PHP, try to install mysql-connector and finally use the IDE to run data analysis on what ever you import into MySQL and scrub. There is a lot of hit and miss, because of the various apks that may be Chinese or Google versions and neither will work. You must find pure Android apks.

    You may also need a fire extinguisher for when the Kindle Fire really does become fire and explodes while running all your clever little machine learning algorithms.

    Tuesday, June 25, 2019

    Friday, June 7, 2019

    Python - Read MySQL Table and Format Output

    # Using phpadmin to load mysql by importing from some of these sources
    # http://www.cboe.com/delayedquote/quote-table
    # https://datashop.cboe.com/option-quotes-end-of-day-with-calcs
    # https://www.stock-data-solutions.com/download.htm
    # https://www.worldtradingdata.com/services
    import mysql.connector
    optionsdb = mysql.connector.connect(
     host="localhost",
     user="root",
     #passwd=""
     database="CSV_DB"
     )
    optionscursor = optionsdb.cursor()
    optionscursor.execute("select convert(`expiration`, CHAR) as expiration, `option_type` as `T`,
    convert(`strike`, CHAR) as `strike`, convert(`delta_1545`, CHAR) as `delta`, convert(`vega_1545`,
    CHAR) as `vega`, convert(`theta_1545`, CHAR) as `theta` FROM `GREEKS` where `open_interest` > 50 and
    ABS(`delta_1545`) > .20 and ABS(`theta_1545`) < 1
    order by `expiration` asc, `option_type` asc, `strike` asc limit 100") optionsresult = optionscursor.fetchall() colheaders = [] colwidths = [] coldivider = '|' colseparator = '+' for names in optionscursor.description: colwidths.append(11) colheaders.append(names[0]) for w in colwidths: coldivider += " %-"+"%ss |" % (w,) colseparator += '-'*w + '--+' print(colseparator) print(coldivider % tuple(colheaders)) print(colseparator) for coldata in optionsresult: print(coldivider % coldata)

    After running, one may get something that looks like this:

    Friday, May 24, 2019

    Still a Sucker for the Kindle Fire 6

    At $15, I just had to replace the one that fell off the motorcycle. I just love the screen size and sturdiness of the device. As such, now I need to root the sucker in order to get rid of ads and install Google Play.
    I enabled ADB through Device Options | Tap Serial # several times | Enable ADB; however, when I ran "adb devices" from a command prompt on Windows 10, the device listed as offline. Curious, I looked at the task manager to see where ADB.exe was running from. Lo and behold it is running from c:/adb.exe.
    Now, I don't think that is the right adb.exe, so I delete it and find one under C:\Users\[me]\AppData\Local\Android\sdk\platform-tools.
    I start that up and toggle the Enable ADB on the Kindle Fire.
    Wallah. The device is now on-line, so I can try the invaluable advice presented at bilal.eltayara.net/blog/2015/07/23/unlock-full-android-power-to-your-amazon-fire-hd-6/

    Links to files needed

  • kindle-fire-updates.s3.amazonaws.com/update-kindle-20.4.5.3_user_453011120.bin
  • github.com/bil-t/fire-hd6-android
  • docs.google.com/uc?id=0B5VDSXB6iXSmTEQ3cnljNzJhZk0&export=download
  • SuperUser
  • TWRP apk for flashing recovery
  • Pico GAPPS
  • Desktop Flasher instead of TWRP

  • Unformatted excerpt from Bilal's blog

    Install Fire OS 4.5.3: Download the 4.5.3 firmware and the apk files Connect the tablet to computer and run the command adb reboot recovery Use volume keys and power button to navigate to Apply update from ADB From the computer type adb sideload update-kindle-20.4.5.3_user_453011120.bin From tablet select wipe data/factory reset From tablet select reboot system Complete setup (do not connect to a wifi network yet) Root the device: Install KingRoot and JmzFireHDTool: adb install KingRoot-4.1.0.249-release-nolog-201505211812_105001.apk adb install JmzFireHDTool_v4.apk Temporarily disable otaverify via adb adb shell pm block com.amazon.otaverifier Connect to wifi and open KingRoot on your tablet Press “try to root” Re-enable otaverifier adb shell pm unblock com.amazon.otaverifier Open JMZ Fire Tools and press Disable OTA's and Disable Ads (most importantly do not install Google apps from JMZ) Install a custom recovery: Install TWRP Manager adb install com.jmz.soft.twrpmanager-7.5.1.3.apk Install TWRP: Run TWRP Manager and give it superuser access when prompted. Say yes if it prompt to apply patch. Tap top-left of screen for slide-out menu and select Install TWRP. Confirm Device Name shows “ariel” and then tap Install Recovery. At warning screen, tap yes. Download the following to Fire’s Download folder (or download to computer and copy to Download folder). 4.5.4 update zip SuperSU update zip Pico GAPPS Update to 4.5.4 Turn off wifi. Boot to TWRP: Power off tablet. Hold down power and volume-up buttons at same time until you see “Amazon,” then release. Install the 4.5.4 update: Tap Install Navigate to Download folder and tap the zip (twrp_ready_update-kindle …) and swipe “swipe to confirm flash.” Tap Home and install the SuperSU update zip. Tap Reboot system. Boot to TWRP Install the GAPPS zip Wipe cache/dalvik and reboot system. Open JMZ Fire Tools and check if Disable OTA's and Disable Ads should be re-enabled. Now open Play Store and sign in. Everything should work now! (When prompted to update store and/or services. Say yes.)

    Wednesday, May 1, 2019

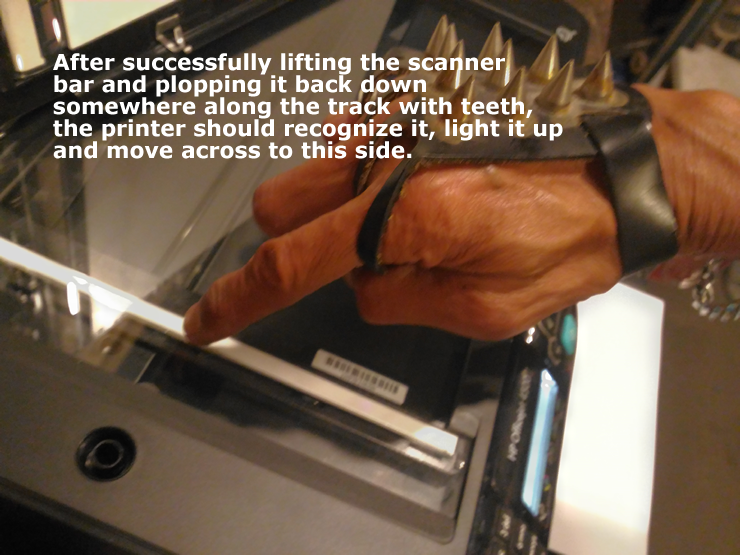
    Fix Scanner Failure Message on HP Officejet 4500 printer

    After buying $50 worth of ink, my HP Officejet 4500 printer threw up a "Scanner Failure" error, rendering it useless. I took it out back to "fix it", but then decided to fix it. Basically, I had to remove the cover, the glass and then lift up the scanner bar and plop it back down on the track. Here are the visuals of that process.